Wednesday, November 2, 2011

Bosch GCM12SD 120-Volt 12-Inch DB Glide Miter Saw

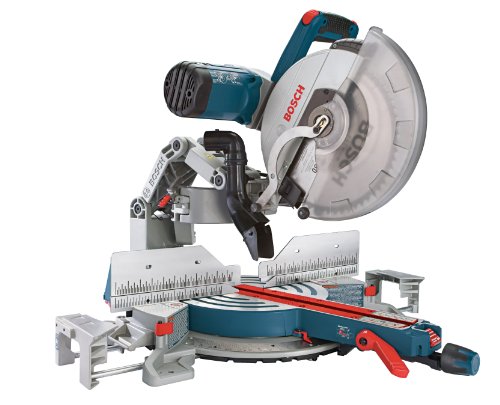
!9# Bosch GCM12SD 120-Volt 12-Inch DB Glide Miter Saw


Rate : | Price : $702.25 | Post Date : Nov 03, 2011 04:43:30
Usually ships in 24 hours

The 12-Inch Dual-Bevel Glide Miter Saw features the smooth cutting motion, accurate performance, and space-saving design of Bosch's patented Axial-Glide System. Pre-aligned Squarelock fences help the saw maintain precision throughout its life, and a soft-grip ambidextrous handle and combination dust chute and vacuum adaptor provide user comfort. The saw also offers a large cutting capacity, easy-to-read bevel and miter scales with detents at common angles, and easy-access up-front controls.

callout box top
12-Inch Dual-Bevel Glide
Miter Saw
At a Glance:
  • 15 amp motor delivers 3,800 rpm no-load speed to handle a variety of materials

  • Compact Axial-Glide System provides smooth, accurate cuts

  • Squarelock quick-release fences allow for easy, precise alignment

  • Easy adjustments with upfront bevel and miter controls and detents at common angles

  • Backed by a one-year limited warranty
callout box bottom
Bosch 12-Inch Dual-Bevel Glide Miter Saw
Easily adjustment the upfront bevel, miter controls, and detents for common
cutting angles. View larger.

Bosch 12-Inch Dual-Bevel Glide Miter Saw
Ensure smooth cuts with a patented Axial-Glide System giving you complete control over the saw's cutting action. View larger.
Compact Axial-Glide System Creates Smooth, Controlled Cuts
Bosch's patented Axial-Glide System is designed to create smooth cuts and ensure you have complete control over the saw's cutting action. Axial-Glide doesn't use a traditional rail setup, so this saw takes up to 12 inches less workspace than many competitors.

Blade Compatibility and Powerful Motor for Versatile Performance
In addition, this Bosch miter saw's 15 amp motor delivers no-load speeds of 3,800 rpm for quick, accurate cuts in many materials. For further convenience and versatility, the saw is compatible with a variety of 12-inch blades, and it has a clear lower guard to provide unobstructed cut-line visibility.

Flexible Setup with Large Capacity
With a 14-inch horizontal capacity, a 6-1/2-inch vertical capacity for material against the fence or base, and a 6-1/2-inch crown capacity against the fence at 45 degrees, this miter saw is useful for a variety of cuts.

Additionally, the saw features two sliding integrated base extensions that provide adjustable support for materials measuring up to 40 inches long.

Quick-Release Squarelock Fences Provide Accurate, Easy Alignment
High-precision, trademarked Squarelock fences come aligned at 90-degree angles to the saw's table and require no adjustments. These quick-release fences utilize a one-touch lock/unlock feature that allows you to easily slide each fence into position for accurate material alignment.

Adjustable Miter Detents and Easy-Access Detent Override
An etched stainless steel miter scale with large, easy-to-read markings lets you accurately set cuts measuring up to 52 degrees to the left and up to 60 degrees to the right. Common angles are easy to set with miter detents at 0, 15, 22.5, 31.6, and 45 degrees on the right and left, and 60 degrees on the right.

A push-button miter detent override helps ensure fine miter angle adjustment for precise cuts. This thumb-actuated control is located at the front of the saw for easy access.

Up-Front Bevel Controls, Marked Detents, and Roof Pitch Angles
The saw's all-metal bevel lock lever and range selector are located up front to make bevel adjustments easy.

The bevel capacity allows you to cut at angles ranging from 0 to 47 degrees to the left and the right, while marked detents and roof pitch angles make the most common angles easy to set. The saw features bevel detents at 0, 33.9, and 45 degrees for both left- and right-facing cuts, and it includes a high visibility dual-bevel scale.

Ergonomic Grip and Dust Capture for User Comfort
Weighing only 65 pounds, this compact miter saw is easy to maneuver. It features a large, ergonomic handle with a soft grip for user comfort, and it offers an ambidextrous trigger setup for both right- and left-handed users.

To further ensure user comfort, this Bosch saw's combination dust chute and vacuum adaptor provides dust capture for a cleaner work environment and improved visibility.

Like all Bosch power tools, the 12-Inch Dual-Bevel Glide Miter Saw is backed by a one-year limited warranty.

What's in the Box
Miter saw, 12-inch 60T blade, tool-free material clamp, blade wrench, 90-degree combination dust chute elbow and vacuum adaptor, and dust bag.


Bosch 12-Inch Dual-Bevel Glide Miter Saw
Quick release fenses provide accuracy and safety while making cuts.
Bosch 12-Inch Dual-Bevel Glide Miter Saw
Push button miter detent lets you preset your cutting options.

Osprey Kode Sale Off Resmed Nasal Masks Ideas

Friday, October 28, 2011

Skil 3820-02 120-Volt 12-Inch Compound Miter Saw with Laser

!9# Skil 3820-02 120-Volt 12-Inch Compound Miter Saw with Laser


Rate : | Price : $199.00 | Post Date : Oct 28, 2011 16:28:08
Usually ships in 24 hours

Includes 120V 12-in Compound Mitersaw with Laser - 3820-02, 40-Tooth Carbide Blade, Extension Table, Extension Rails (2), Vertical Clamp, Stop Block, Die-Cast Aluminum Sliding Fence, Dust Collection Bag, Blade Guard, Blade Wrench

Frigidaire Gallery Refrigerator Buy Good Bargain Playtex Girdle Best Prices Blue Dragonfly Mic

Tuesday, October 18, 2011

Wall tiling over kitchen worktops. A abundant guide.

!9# Wall tiling over kitchen worktops. A abundant guide.

[if ]
[endif]

Tiling a kitchen splashback is a task that can be carried out by many DIYers. It needs (like most tasks) some planning and preparation in order not to waste time and money. A simple to do list will help you on the steps to take hence trouble free and relaxed attitude in accomplishing your project.

So, where to begin? First of all find out if you are ready for tiling. A couple of things to consider are:

1) Are you in need to replace any kitchen units or worktops?

2) Have you got existing tiles over the walls?

If you are considering changing the work surface at some stages soon, then it will make sense to wait a bit longer as the tops thickness could be different from the existing one or maybe you discover that you prefer a different colour, style or fashion which won't match the tiles that you have purchased (this has happened several times).

With advanced technology is has been possible purchase special tile adhesives to install new tiles on to existing tiles. It is worth mentioning that (where suitable) special attention will need to be paid on the existing background. Can the existing substrate hold the weight of the new covering? Will the perimeter edges be seen? Will you be happy to see two layers of tiles sticking out from the walls or is better to remove the existing layer? Will the extra thickness of tile be pushing outwards the electrical outlets, causing problems with the socket's screws being too short? What about the electric cables on the sockets not been able to be stretched enough! All of this must be taken in consideration before you embark with your project. If you are taking the old tiles off the wall do make sure that all adjacent areas are protected by padded dust sheets and that you have full protection gear on as the tiles can easily cut through bare skin. Dust mask and goggles are an absolute must.

Sizing up the tiles Before you do anything else check to see if you have the correct tiles, the correct amount of tiles and if you are using border tiles and/or inserts/decor tiles then check for size variations. This happens often. If there are size variations you will need to take this into account before deciding on what type of spacing is more aesthetically right. What can happen is that you may have started to tile the wall and have a 1.5 mm joint, then you put the border on top and the border being to big, will go out of alignment from the rest of the tiles. Take your time. Try to visualize all the tiles on the wall, as a finished job, then you can foresee any possible problems and avoid them.

Nearly ready to tile Have a look on the tile’s packaging to see if there are special recommendations for spacing the tiles. Different tiles will require different joint sizes. If you use standard ceramic wall tiles you could use 2 mm tile spacers and if you use rustic tiles, 5 - 10 mm spacers. All is relevant to the style and working size of the tiles. Check for batch difference, and always open several boxes and use few tiles from each box. Check the worktops with a spirit level (Ideally one that is 120 cm or longer); see if the tops are level, if not you might need to space up the lowest section with tile spacers or cardboard.

If the base is too much out of level from one end to the other, then you will need to allow a full tile at the lowest point and then draw a level line at the top of this tile and any tiles that do not fit from the line down to the worktop, will need to be trimmed to size using a tile nippers or wet tile cutter. Many times when you try to draw the line you find that the sockets are in the way. If this happens then instead of using one tile at the lowest point, use two tiles, (one on top of the other and draw the level line at the top of the second tile) that usually works. Don’t forget to insert a tile spacer if you are using any. On rare occasions you will need a laser level with a continuous projected line or a rotating laser level. This will nicely go around the obstacles.

What spreading trowel to use. The thickness of the adhesive should be such that when the tile is in its final place, the adhesive should not squeeze out from the joints. Most times a trowel with 6 mm notches is fine and in general you can use tiles of 10 - 20 cm square. If mosaic is to be installed then you might need a 3 mm notched trowel and if hand made tiles are to be used, then either use the 6 mm trowel and butter up the back of the tile, or use a 10 mm and above to suit the tiles. More adhesive will be required if the tiles have a deep profile or studs than if the back is smooth. If there is adhesive squirting out from the tile joints, then use a thin flat screwdriver or Stanley knife to clear the joint and then use a damp cloth or sponge to clean the tiles. It is important not to have the adhesive getting in contact with natural stone (like marble) as it can stain it and then detract from its nice look.

Electrical points. Undoubtedly you going to have to cut around electrical points (sockets, fuse spurs, cooker switches, light switches, etc.) Make sure that you know where the electric supply is and SWITCH IT OFF. You should be able to isolate the kitchen electricity so that you can still use other sockets around the house.

Tiling tools. There are plenty of DIY tiling tools on the market that allow you to carry out tiling on a small budget. If you are using thin ceramic tiles then a tiling starter kit can help you. Here is what you will need for an average job.

* Manual tile cutting machine

* Spirit level

* Tile nippers

* Tile file or sanding block

* Electric tile saw

* Protective goggles

* Electric extension lead

* Squeegee

* Protective gloves

* 2 Clean buckets

* Sponge

* Stanley knife

* Tile spacers

* Pencil or tile marker

* Mixing trowel

* spreading trowel

* Silicone shaping tool or kit

* Tile trim mitre box

* Ear protectors

* Dust masks

Tile Trims. On some occasions it is necessary to add tile trims to the tiles. An example of this is where two tiles meet on an external angle, where the tile edge will need protection from being chipped or if the walls are not plumb and it is required to have cuts at both extremities, or if the tiles have no glazed edges. If you like or need tile trim, make sure you use the right size ones to fit the thickness of the tile. Some tiles do not require tile trims as they have their edge glazed, others will need trims. If you are painting the walls adjacent to the tiles, you could use the trims only on the external angles where the tiles meet and simply paint the unglazed edges on the top of the last tile.

Windows. If one wall to be tiled has a window on it, find the middle point of the window sill and measure with the tiles to see how big the end cuts are. If the end cuts are too small, offset the middle point to half tile and recheck. Start with the best measurement in order to achieve the best look ( you will want a cut that is bigger than 20 mm). Attention must be applied to not end up with opposite cuts too big (nearly full tile), as this would give you very small cuts on the front vertical of the window and hence can give you problems with either cutting the tiles or an even worse problem with alignment if the vertical edges are off plumb. Also check to see if the window sill is level. Many times it isn’t and if that’s the case you can find the highest spot and when it comes to tile the front (between the worktop and the windowsill) start from there and when you are ready to tile the top of the sill, fill it level with adhesive. If the difference is too much, you might have to use two layers of tiles or make good with some plaster or cement before tiling.

First tile the front wall to the height needed and then cut and apply the tile trim (if required) on the perimeter and then tile the window sill and sides.

Grouting Once the tiles have been installed let them dry overnight before grouting. You will need to buy the right grout for the tiles used:

* Thin joint grouts for small joints (some grout can be used from 1 - 5 mm)

* Wide joint grouts for joints of 3 -20 mm

* Standard grouts

* Flexible grouts (developed for porcelain tiles or where small movements are possible)

* Epoxy grouts for industrial and/or special hygiene areas

Always read the manufacturer’s instructions on the usage and application.

Silicone Once the grout has dried you can apply the silicone sealant if needed.

You can buy silicone suitable for general use, this is usually of the “Acetoxy” type but if the tiles are made of natural stone then you will need a silicone suitable for this (ask your supplier for a “Neutral Cure” silicone) as general silicone might stain some marble. Silicone is a beast of its own. You will need to be quick and careful with it! It can be helpful if you purchase a silicone tool kit.

If you have to remove old silicone, help is at hand in the form of “silicone remover”. Easy to work with making it easier in removing decayed, mouldy silicone. more...

Hope this is clear and helpful to you. Happy tiling. :)


Wall tiling over kitchen worktops. A abundant guide.

Artesian Spas Parts Best

Tuesday, October 4, 2011

DEWALT DW718 12-Inch Double-Bevel Slide Compound Miter Saw

!9# DEWALT DW718 12-Inch Double-Bevel Slide Compound Miter Saw

Brand : DEWALT | Rate : | Price : $474.00
Post Date : Oct 04, 2011 21:38:42 | Usually ships in 24 hours


  • Powerful 15-amp, 3,600 rpm motor delivers extended power and durability
  • Adjustable stainless steel miter detent plate with 10 positive stops improves productivity and ensures cutting accuracy
  • Precise miter system and machined base fence support optimize cutting accuracy
  • Tall sliding fences support crown molding up to 6-5/8-inch nested and base molding up to 6-1/2-inch vertically against the fence
  • Innovative gearbox and belt-drive design increases vertical cutting capacity

More Specification..!!

DEWALT DW718 12-Inch Double-Bevel Slide Compound Miter Saw

Purchasing Plum Curtains

Saturday, October 1, 2011

Factory-Reconditioned Skil 3385-01-RT 2.5 Amp 9-Inch Band Saw

!9#Factory-Reconditioned Skil 3385-01-RT 2.5 Amp 9-Inch Band Saw

Brand : Skil
Rate :
Price : Too low to display
Post Date : Oct 02, 2011 01:15:30
Usually ships in 1-2 business days


This is a reconditioned power tool. Reconditioned generally means that the tool has been returned to the manufacturer, who brings the tool back to like new conditions. Some tools may contain cosmetic blemishes. The latest addition to the Skil family - the 3385-01 Band Saw with Light. It has a powerful 2.5 Amp motor with laser cutline guide for accurate cuts. It has a 6-TPI Band saw blade which cuts through a variety of wood materials. The dust port accepts standard shop-vac hoses.

Promotion Bulgari Sunglasses

Wednesday, September 7, 2011

Hitachi C10FSH 10-Inch Sliding Compound Miter Saw with Laser

!9# Hitachi C10FSH 10-Inch Sliding Compound Miter Saw with Laser

Brand : Hitachi
Rate :
Price : $494.75
Post Date : Sep 07, 2011 07:45:11
Usually ships in 24 hours


The Hitachi C10FSH 10-Inch Sliding Dual Compound Miter Saw with Laser Marker provides smooth, accurate miters and crosscuts in a variety of workpieces, including wood, plywood, decorative panels, soft fiberboard, hard board, and aluminum sashes. An ideal tool for trim carpenters, framers, and woodworkers who demand precision and reliability, the C10FSH offers professional-grade performance with its laser marker, dual-bevel cutting action, soft start function, electric brake feature, electronic speed control, and more.


C10FSH Compound Miter Saw
Tool Specifications
Amps12
No-Load Speed3,800 RPM
Blade Diameter10"
Arbor Size5/8"
Bevel Angle Range
(R & L)
0°-45°
Bevel Stops (R & L) 0° and 45°
Miter Angle RangeRight 0°-57°
Left 0°-45°
Miter Detent Stops
(R & L)
0°, 15°, 22.5°,
31.6° and 45°
Tool Height24-1/4"
Weight43 lbs


The carbon brush and dust-collector bag keep the saw working for the long term.


Make extremely precise cuts with the help of the laser guide. View larger.


Adjust the bevel up to 45 degrees to the left or right. View larger.


Miter scale and thumb-actuated miter stops facilitate simple adjustments at the most common angles. View larger.
Powerful Motor Provides Smooth, Accurate Cuts
The C10FSH Sliding Dual Compound Miter Saw features a powerful 12-amp motor that generates a no-load speed of up to 3,800 RPM for easily making crosscuts and miters in even the toughest workpieces. The electronic speed control ensures consistent RPM throughout the cut, so you get smooth, precise, controlled cuts each and every time.

Additionally, the C10FSH utilizes a Poly-V-Belt transmission rather than a traditional gear transmission. This soft start technology allows the saw to operate smoothly and quietly and reduces recoils during startup.

Compound Feature for Precise Miters and Bevels
Hitachi designed the C10FSH for versatile, easy use. The thumb-actuated positive miter stops allow for simple miter adjustments at the most common angles: 15.0, 22.5, 31.6, and 45.0 degrees to the right or left. The tool also features a 57-degree miter angle to the right and a 45-degree miter angle to the left for maximum flexibility. Additionally, a white-on-black miter scale provides superior visibility, allowing you to easily adjust the angle of the cutting blade for creating miters in crown molding and other trim pieces.

And with a bevel range of 45 degrees to the left and right, you can quickly and easily flip the saw blade while leaving your material in place. To save you even more time, bevel stops to the right and left are conveniently located at zero and 45 degrees.

The 10-inch TCT saw blade (included) makes easy work of trim and other woodwork, and the linear ball-bearing slide system and adjustable pivot fence allow for accurate cutting of large workpieces over 12 inches deep.

Laser Marker Technology for Perfect Cuts Everytime
Hitachi equipped the C10FSH with its exclusive Laser Marker System, which can be activated before the blade is in motion for exact alignment and predictable blade placement. The laser marker is easily adjustable to suit your preferences, simply line up the laser with your mark on the workpiece, and the saw blade will make an exact cut along the laser guide. As long as your measurements are right, your cuts will be, too!

Chock-Full of User-Friendly Features
The C10FSH contains plenty of features to help you make the perfect cut the first time. To start, a splinter guard behind the fence increases safety and reduces tear-out for clean, finished cuts. A patented, fully adjustable chip deflector also prevents tear out, aligns the cutting line, and provide zero-clearance support.

For further refinement, a large table provides a stable guide and sturdy support, a built-in clamping system holds your workpiece in place, a comfortable vertical handle with a vibration-reducing elastomer grip keeps you in control, and an electric brake feature quickly halts the blade to prevent unintended cuts.

The C10FSH also includes a dust collector that minimizes accumulation of dust and particles in your both your workspace and the saw's interior components, keeping your jobsite clean and prolonging the life of the tool. An added bonus, easily accessible carbon brushes will help your saw perform for the long term.

Durably built, this tool is backed with an industry-leading five-year warranty. It is compatible with Hitachi's UU610 Universal Work Station.

About Hitachi: A Tradition of Innovation
Hitachi Power Tools (Hitachi Koki USA, Ltd.) provides professional-grade power tools for a variety of applications, including woodwork, metalwork, concrete, drilling, cutting, and fastening. Hitachi is a leader in power tool research and development and has achieved many firsts in the power tool industry, including creating the first-ever sliding compound miter saw to combine the capacity of a radial arm saw and the convenience of a miter saw. Today, Hitachi continues the tradition of innovation and engineering with new features in addition to classic quality.

What's in the Box
C10FSH 10-Inch Sliding Compound Miter Saw with Laser Marker, 10-inch TCT saw blade, box wrench, dust bag.


Linear ball-bearing slide system helps you cut large workpieces.

Wholesale Polk Audio Center Channel Yamaha Dgx640 Guide


Sponsor Links